Adding & Managing Invitees
Find out how to add or import Invitees to your event database

Mark
Last Update 4 jaar geleden
Invitees are the guests whom you would like to invite to your event by sending them invitation eDMs, which can be done via our Communication Channel. This article shows you how to add or import Invitees and to manage your Invitee List.
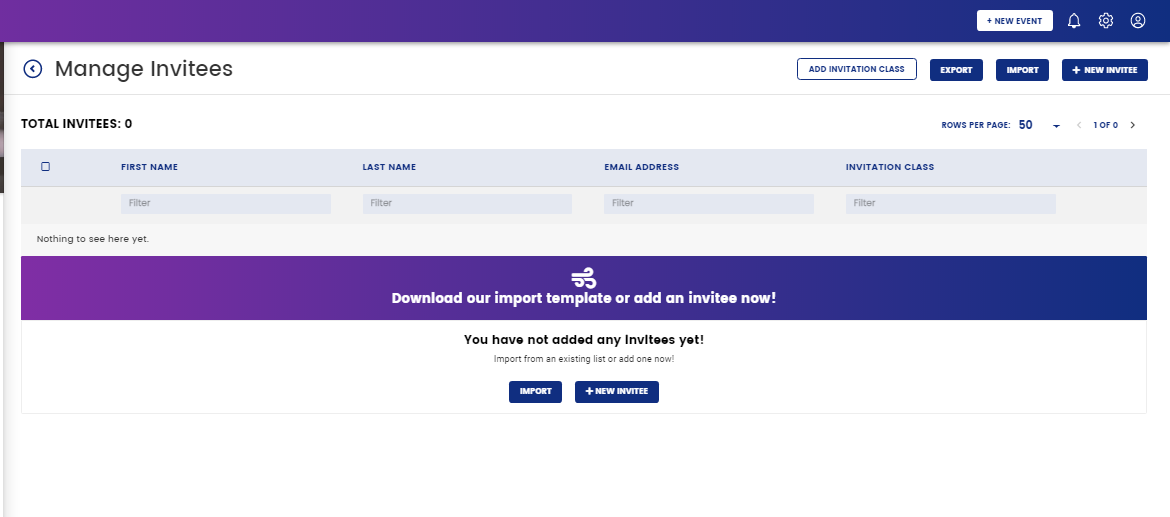
Accessing Invitee List
In the correct Event Workspace, select 'Solutions' from your Event Menu, followed by 'Communication Channel'. Once you are in the Communication Channel Control Panel, click on the 'Manage Invitees' widget listed under 'Manage'. You will be directed to the Manage Invitees page. This is where your Invitee List is!

If there are no Invitees on your list, you'll see a prompt with three buttons:
- Export
- Import
- + New Invitee
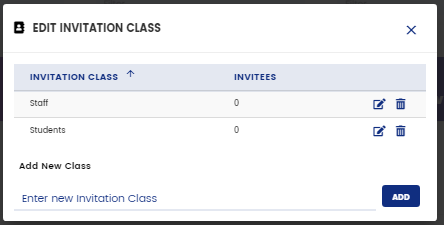
Adding & Managing Invitation Class
The Invitee list can sometimes get messy. A way to organize it is by sorting Invitees into different Invitation Classes.
To add an Invitation Class, simply click on the 'Edit Invitation Class' button in the Page Title Bar. A popup will appear where you can add new Invitation Classes, rename, and delete existing ones. Do take note that when you delete an Invitation Class, all the Invitees in it will be deleted as well!
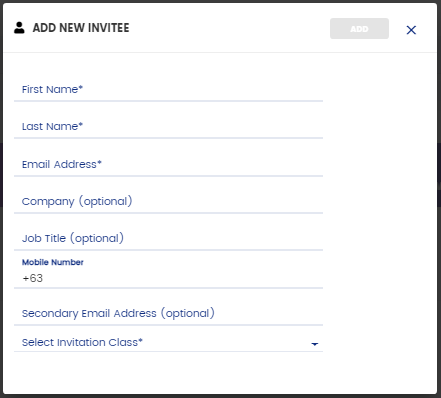
Adding Invitees
To add an Invitee to your list, click the '+ New Invitee' button. Fill in the basic details of the Invitee and select the Invitation Class to which you'd like to add this him/her. If you haven't created any Invitation Class yet, you can do so by selecting '+ New Invitation Class' from the dropdown menu to name a new Invitation Class. Once you are done, click 'Add' and your Invitee would be added.
Importing Invitees
It's common to always be updating your Invitee List but you don't always want to add Invitees one by one. The import function allows you to import Invitees by Invitation Class. Please note that you can only import Invitees from one Invitation Class at a time!
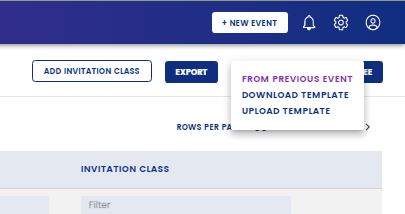
Step 1. Download Excel Template
Click the 'Download Template' button if you see it. If not, click the 'Import' button at the top right of the Page Title Bar to open a dropdown menu and click 'Download Template' from there.
Step 2. Fill Up Your Excel Template
Once it has downloaded, simply fill in your Invitee information according to our template. Remember that you can only import Invitees from one Invitation Class at a time! So please only key in Invitees who are in the same class into each template that you are intending to upload.
Step 3. Upload Template
Head back to the Managing Invitees page and click 'Import' > 'Upload Template'. A popup will appear where you will need to select the appropriate Invitation Class before uploading the completed template so we know exactly where to put your Invitees. If you have not added any Invitation Class yet, you can add a new one by selecting '+ New Invitation Class' from the dropdown menu and keying in a label.
Once you have selected an Invitation Class, click 'Upload Completed Template' and choose the file to upload. When import is complete, you will be notified of the number of Invitees that were successfully imported.
Take note that if you upload multiple lists with duplicate guest entries, they will not be filtered out so always use a fresh template when you're using the list import again!
Editing Invitees
Simply hover over the Invitee whose details you'd like to update and click on the edit icon. Remember to save your changes after editing.

Deleting Invitees
You can delete all the Invitees belonging to the same Invitation Class by deleting the Invitation Class in question. To do so, click the 'Edit Invitation Class' button followed by the trashcan icon of the Invitation Class that you would like to delete.
You can also delete a single Invitee at each time simply by hovering over the Invitee in question and clicking the trashcan icon.
